How to Read Guitar Chord Diagrams 101
So you want to learn how to read guitar chord diagrams? No worries, reading a guitar chord diagram is more straightforward than it looks! Follow this easy step-by-step guide, and you’ll be able to read and understand guitar chord diagrams quickly.

If you are beginning to play the guitar, we’ve got you covered with this easy-to-follow guide! We’ll show you all the basics, including identifying symbols and what they mean when trying to play a chord.
Guitar chord diagrams are representations of a guitar chord, indicating where to place your fingers on the fretboard and which strings should be strummed or muted.
Keep in mind, these are the very basic concepts to get you started with playing chords and musical journey. If you want to progress in your journey and increase your skills we recommend enrolling is some of the online guitar courses like Guitar Tricks.
Feel free to read each section or skip to one that address what you are looking for.
How to Read Guitar Chord Diagrams
The Diagram:
Take a look at the chord diagram. It will usually depict the frets and strings of the guitar and will feature symbols that indicate which notes to play. You simply locate the notes indicated in the chord diagram and press down on those strings. The notes you play will make up the chord. To make sure you are playing it correctly, listen to how it sounds and compare that to recordings of the same song or chords. With practice, you’ll be able to master each chord quickly!
The Vertical Lines
- Vertical lines simulate the strings on a guitar. Imagine that you are looking at a guitar that is standing.
- Identify the thickest line on the diagram or one to the left. This is the sixth string or the Low E string. This is the string that has the lowest pitch.
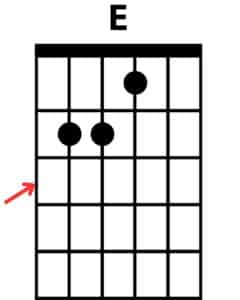
The Horizontal Lines
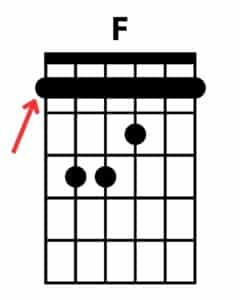
- Look for any thicker lines on the diagram. These will represent the nut of the guitar located at the head of the fretboard.
- Identify the horizontal lines. These will depict the frets on the guitar. The numbers on the lines indicate which fret to use.
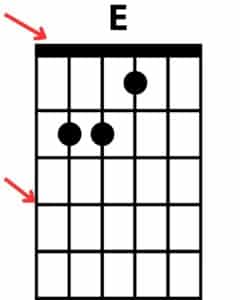
The Dot’s, Circles, and Numbers
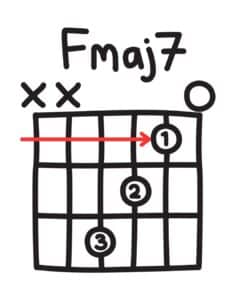
- Look for any dots or circles on the diagram. These indicate which strings to play and which fret to press. Some diagrams have numbers inside the circle guiding you on what finger you should use, while others don’t.
- You may see a bar going across multiple strings. This indicates that all of those strings should be pressed by going across with one finger.
X’s and O’s
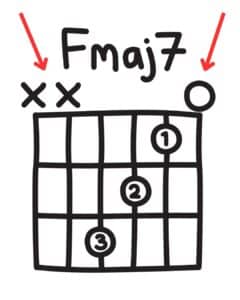
- Look for any Xs or Os on the diagram. These indicate which strings should not be played by the Xs, and Os are the strings that could be played open (without a finger on the string).
Play The Chord!!
- Play the chord by pressing down on the strings with circles or dots while avoiding any strings with Xs.

Now What?
By following our step-by-step instructions, you can now say you can read guitar chord diagrams. Keep practicing, and soon you’ll be reading guitar chord diagrams like a pro! Of course, as you progress in your learning, you will be able to get more detailed and play more complex chords, but start with simple chords like C, D, E, G, etc.
If you want a starting point, check out our free chords finder tool and then our 11 Easy Beginner Guitar Songs to get started! That said, we get it, you need more to understand it. Remember this is not a race, it is a journey, and like any journey, you have to start somewhere. We are here to help you learn and grow as a musician with not only the gear you need but also your skills.
For our fellow guitarists that want to advance in their journey, we recommend enrolling in a fun course like Fender Play. This provides the best way for you to understand the basics and progress in your guitar playing.


